Nov 13, 2013
How to Downgrade OS Samsung Galaxy Grand Duos GT-I9082
How to downgrade firmware on Samsung Galaxy Devices:
Required files: download the firmware file that you want your Galaxy device to downgrade to. One good source for downloading Samsung firmwares is Samsung-Updates.
- Extract the downloaded firmware on your computer.
- Download Odin Firmware Flasher and unzip it. Using Odin 1.85 version for installing older firmware and using Odin 3.04 for newer ones is recommended. Download the relevant ones from these links: Odin3_v1.85.Zip OR Odin3_v3.04.Zip.
- Switch off your Galaxy device and boot into Download/Odin Mode. If it is a Samsung Galaxy phone, you can do so by pressing and holding the Volume Down + Home + Power buttons simultaneously until the screen turns up.
- Go to the Odin folder and run the .exe file there.
- Connect your Samsung device to the computer using a USB cable. When the connection between the device and computer is established, the ID:COM port at Odin screen will show you an Added!! message.
- Make sure that only F. Reset Time option is checked on Odin. Uncheck the Auto Reboot option which is checked by default.
- Next, click on the PDA button on Odin and select the firmware file in tar.md5 format.
- Press START on ODIN to initiate the firmware installation process. The process will take a few minutes. When it’s completed you’d get a PASS message on Odin.
- Disconnect the device and remove the USB cable.
- Open the back panel of your device and pull out the battery. Wait for some 60 seconds and reinsert the battery back.
- Reboot your device into Android Recovery Mode: For smartphones >> by pressing and holding Volume Up and Home buttons together and then hold the Power key till screen shows the Samsung logo. Release the power button but keep the other two keys pressed until you see a black screen with green Android bot and blue text. For Galaxy Tab or Note 10.1 >> press and hold the Volume Down + Power keys together for a few seconds until you see the yellow triangle with Android bot followed by a black screen with blue text.
- Once in recovery mode, use the Volume Up/Down keys to scroll up or down, and use the Power button to select any option.
- Perform the wipe operations by scrolling down to wipe data/factory reset option and select yes to confirm the process. Next, go to wipe cache partition and confirm it.
- Once done, go to the reboot system now option to boot your Samsung Galaxy device into the older version.
The long process is finally done and you are now using your Samsung Galaxy device in the downgraded firmware that you liked!
Source : http://wccftech.com/
Nov 7, 2013


Oct 24, 2013
Update Samsung Galaxy Grand i9082 ke Android 4.2.2 Jelly Bean

Seperti yang sudah kita ketahui bahwa saat ini Samsung tengah mempersiapkan update Android 4.2.2 Jelly Bean untuk beberapa smartphone seri Galaxy. Salah satu smartphone dari Samsung yang akan mendapatkan update 4.2.2 ini adalah Galaxy Grand i9802.
Samsung Galaxy Grand sendiri sudah hadir di Indonesia, dimana smartphone ini menawarkan sepesifikasi seperti layar sentuh berukuran 5 inci dengan resolusi 480 x 800 piksel, prosesor dual core 1,2GHz, RAM 1 GB, memori internal 8GB, kamera 8 megapiksel, kamera depan 2 megapiksel, baterai 2.100mAh, dan lainnya.
Bagi anda yang sudah memiliki Galaxy Grand ini, mungkin sudah tidak sabar ingin mencipipi update Android 4.2.2 Jelly Bean di perangkat anda. Dan sekarang anda sudah bisa mencoba update terbaru 4.2.2 Jelly Bean yang disediakan oleh SamMobile.
Update ini masih dalam versi beta jadi kemungkinan masih terdapat bugs. Update ini menawarkan beberapa fitur terbaru seperti: menu notifikasi transparan, Smart Stay, Light effect by unlocking, Page Buddy, Day Dream, dan terasa lebih cepat dibandingkan dengan versi 4.1.2.
Anda bisa mengupdate Android 4.2.2 Jelly Bean ini di Galaxy Grand i9082 (versi dual SIM), dan ingat resiko kerusakan ditanggung oleh anda sendiri.
Cara update Android 4.2.2 Jelly Bean di Galaxy Grand i9802
- Download firmware disini. atau DISINI
- Extrak file zip yang telah didownload
- Buka aplikasi Odin 3.07 yang ada pada paket firmware yang telah didownload
- Matikan perangkat anda, kemudian masuk menu download mode (tekan dan tahan tombol Home + Power + Volume down)
- Hubungkan Galaxy Grand ke komputer dengan kabel data, tunggu hingga muncul warna biru pada aplikasi Odin
- Setelah muncul tanda biru, klik tombol Code pada Odin, kemudian pilih file CODE_I9082XXUBMF2_871997_REV05_user_mid_noship.tar.md5 dari paket firmware yang telah di download.
- Berikutnya klik tombol CSC, dan pilih file CSC_OXA_I9082OXABMF2_871997_REV05_user_mid_noship.tar.md5.
- Berikutnya klik tombol modem, dan pilih file MODEM_I9082XXUBMF2_REV05.tar.md5.
- Dan berikutnya klik tombol PIT, dan pilih file baffin.pit.
- Pastikan re-partition tercentang
- Tekan tombol Start, dan tunggu hingga proses update selesai (jangan cabut kabel data dan jangan matikan PC, lebih baik menggunakan laptop)
- Setelah selesai Galaxy Grand akan menyala
- Dan jika tidak bisa masuk menu (bootloop) atau ada maslah Force Close, matikan perangkat
- Kemudian masuk ke recovery mode (tekan dan tahan tombol Home + Power + Volume Up)
- Pilih wipe/factory reset (akan menghapus semua file termasuk file yang ada pada memori internal)
- Kemudian pilih reboot
- Dan sekarang anda bisa merasakan Android 4.2.2 Jelly Bean di Galaxy Grand anda.
Selamat mencoba.
source : http://mobile88.co.id
Oct 11, 2013
Cara Portrait dan Landscape dalam 1 (satu) file di Microsoft Word
Add different page numbers or number formats to different sections
Let’s say you want to use different page numbers or number formats and styles in different parts of your document, such as i, ii, iii…for the introduction and table of contents and 1, 2, 3… for everything after. The trick is to divide the document into sections and to make sure those sections aren’t linked.
- Click at the very beginning of the first page where you want to start, stop, or change the page numbering.
- Under Page Layout, in the Page Setup group, click Breaks > Next Page.

- On the page after the section break, double-click the header or footer area to open the Design tab underHeader & Footer Tools.
- In the Navigation group, click Link to Previous to turn it off.

NOTE Headers and footers are linked separately, so if your page number is in the header, turn off linking for headers. If your page number is in the footer, turn off linking for footers.
- In the Header & Footer group, click Page Number and then pick a location and a style.

- To choose a format or to control the starting number, in the Header & Footer group, click Page Number >Format Page Numbers.

- Click the Number format or the Start at number that you want to use, and then click OK.
- When you’re done, double-click anywhere outside the header or footer area to close it, or click the Close Header and Footer button.

Source : http://office.microsoft.com
Oct 1, 2013
Cara Mengatur Halaman pada Microsoft Word

Seperti contoh pada gambar, halaman pertama pada setiap bab akan berbeda posisinya dengan halaman-halaman yang lain. Biasanya untuk pengaturan seperti ini, ada yang memisahkan setiap bab dalam dokumen yang berbeda.
Tetapi dengan penggunaan section break maka kita dapat menggabungkan beberapa bab dalam satu dokumen yang sama.
Lebih jelasnya tentang penggunaan section break dapat dibaca di artikel ini:Gunakan Section Break untuk Mengatur Layout dan Format Dokumen di Word.
- Klik ganda pada header/footer untuk memunculkan Header & Footer Tools.
- Pada Design tab, grup Options, centang kotak Different First Page.
- Pada halaman pertama, buat nomor halaman seperti contoh pada gambar.
- Kemudian pindah ke halaman kedua, dan beri nomor halaman di kanan atas.
- Selanjutnya kita akan membuat section baru untuk memisahkan antar bab. Taruh kursor di bagian yang ingin dibuat section baru (contoh pada gambar: di tulisan Chapter 2).
- Pada Page Layout tab, Page Setup, klik Breaks.
- Dalam grup Section Breaks, pilih jenis break Next Page. Sekarang lihat format nomor halaman pada section 2 akan sama dengan section 1.
- Selanjutnya bila kita ingin menambahkan bab baru, ikuti langkah 5-7.
Source : www.computer1001.com
Sep 18, 2013
Cara Mengatur Auto Save di Microsoft Office Word 2007
Pada kesempatan kali ini akan memberikan tutorial mengenai “CARA MENGATUR AUTO SAVE DI MICROSOFT OFFICE 2007”. Nah tentu kita pernah mengalami kendala pada saat melakukan pekerjaan di Microsoft Office, kendalanya yaitu data kita belum tersimpan. Selama ini kita menyimpan data itu secara manual yaitu dengan mengklik perintah Save atau CTRL S. Nah selain cara manual ada juga loh cara menyimpan secara Otomatis.

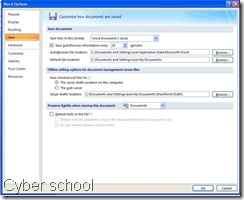
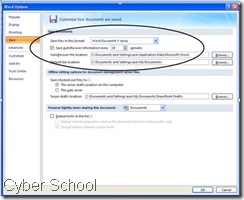
Ok. Untuk lebih jelasnya langsung saja ke TKP.
1. Anda jalankan terlebih dahulu program Microsoft Office (Excel,Word dan Powerpoint), sebagai contoh saya menjalankan program Microsoft Office Word.
2. Setelah itu anda klik tombol Office Button kemudian anda pilih Word Options.

3. Langkah selanjutnya, jika sudah anda klik tombol Word Options, maka nanti akan muncul jendela Word Options, pada bagian ini anda pilih yang tulisan Save.

4. Setelah itu anda atur deh Save AutoRecover information every (waktu penyimpan otomatisnya anda mau setiap berapa menit ). Kemudian anda atur juga AutoRecover file location (tempat penyimpanan cadangan jika terjadi listrik padam). Default file Location (alamat penyimpanan tempat untuk hasil kerja kita). Jika sudah siap maka anda klik tombol OK.

Nah buatlah AutoSave pada program Microsoft Office anda, biar apabila terjadi listrik padam, maka data anda tidak akan hilang..
Ok. Sekian tutorial dari saya
Semoga dapat bermanfaat untuk kita semua
Source : angga-sukses.blogspot.com
Subscribe to:
Posts (Atom)